2015年8月13日 星期四

RH124_01_Access the command line

Linux兩種操作介面
1. Command Line: Shell (Bash, ZShell)
2. Graphic: KDE, GNOME

bash shell
1.一般使用者
   [student@desktopX ~]$
2.管理員root
   [root@desktopX ~]#

操作介面切換
Graphic切換至 Command Line:Ctrl+Alt+F2~F6
Command Line 切換至 Graphic:Ctrl+Alt+F1

Linux基本指令 Shell basics
Command [Option] Arguments
       指令            參數         目標

啟動 GNOME Help視窗
yelp
GNOME網站:https://www.gnome.org/

指令查詢
--help
$date --help
date [OPTION]... [+FORMAT]
man
man date
q 離開man page

離開shell
$exit
$logout
Ctrl+D

查詢日期時間
$date
2015年 8月13日 周四 10時00分00秒 CST
$date +R
08:13
$date +%x
2015/08/13
$date +%Y-%m-%d
2015-08-13

更換密碼
$passwd  輸入兩次密碼

檔案簡介
file 列出檔案類型(ASCII text, binary, directory...)
$file /etc/passed
$head /etc/passed 列出檔案內容前n行,預設10行
$tail /etc/passed 列出檔案內容後n行
$tail -n 3 /etc/passed 列出檔案內容後三行
$wc /etc/passwd 計算檔案line、words、characters
91 249 5581 passwd
$wc -l /etc/passwd 計算檔案 line
$wc -w /etc/passwd 計算檔案 words
$wc -c /etc/passwd 計算檔案 characters

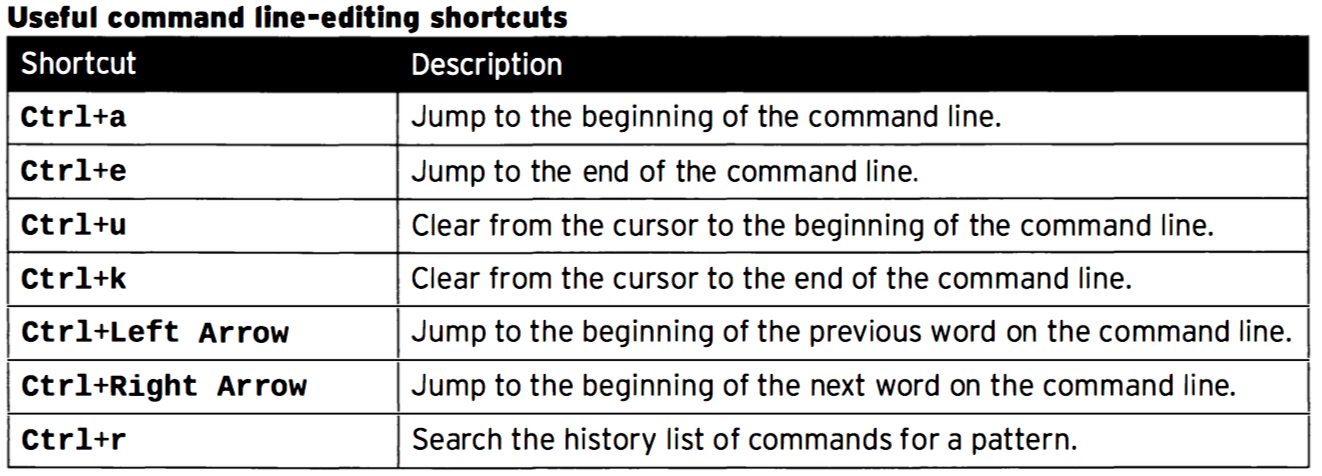
指令編輯
[tab]  自動補齊檔名或路徑名稱
$history  列出過去打過指令
$!!s 列出最近下過的指令,例如 !!s
$!N  執行過去打過編號N行的指令,例如 !28
$!!    執行上一個指令
↑  列出上一個指令
;  分隔兩指令
$clear 清除指令
Esc+. copy the last argument of previous commands
2015年8月6日 星期四

RHEL7用MariaDB、phpMyAdmin建置資料庫

MariaDB 資料庫建置
1. 安裝 MariaDB 套件
     在「應用程式/系統工具/軟體/搜尋MariaDB」,安裝以下套件
     mariadb-bench
     mariadb-devel
     mariadb-server
     mariadb-test
2. 啟動 MariaDB 服務
    #systemctl enable mariadb.service
    #systemctl start mariadb.service  
    #mysql -u root -p 
    在此先不設定密碼,按 ctrl+c 離開
    出現如下畫面,並留意Server版本
    Welcome to the MariaDB monitor. Commands end with ; or \g.
    Your MariaDB connection id is 2
    Server version: 5.5.35-MariaDB MariaDB Server

phpMyAdmin 建置
1. 下載 phpMyAdmin
    至官網(https://www.phpmyadmin.net/)Download「phpMyAdmin.tar.gz」
2. 將檔案拷貝至 /var/www/html,解壓縮、將資料夾重新命名為「phpMyAdmin」
3. 修改文件屬性
    #restorecon -R /var/www/html/phpMyAdmin
3. 安裝 php 套件
    在「應用程式/系統工具/軟體/搜尋php」,安裝以下套件
     php-5.4.16
     php-cli
     php-common
     php-gd
     php-mcrypt
     php-mysql
     php-pdo
4.安裝 web(apache) 套件
    在「應用程式/系統工具/軟體/搜尋httpd」,確認安裝套件  Apache
5. 啟動 httpd 服務
    #systemctl restart httpd.service
    #cd /var/www/html
6. 進入phpMyAdmin頁面
    連至 http://localhost/phpMyAydmin
    顯示缺少 mbstring
7. 下載mbstring
    搜尋「php mbstring centos7 rpm」
    找到 RPM CentOS 7 php-mbstring 5.4.16 x86_64 rpm
   下載「php-mbstring-5.4.15.21 ell7.x86_64.rpm」,點擊便可安裝。
8. 重新啟動 http 服務
    #systemctl restart http.service
    再次連至 http://localhost/phpMyAydmin
    頁面顯示「歡迎使用phpMyAdmin」,但沒有登入帳密

phpMyAdmin初次登入沒有密碼
1. 修改設定檔登入
    將config.sample.inc.php重新命名 config.inc.php
    用gedit編輯檔案
    $cfg['blowfish_secret']='abcdefg';
    引號內可以擺任意字元
    $cfg['Servers'][$i]['AllowNoPassword']=true; 
    將false改為true,允許root登入不用密碼!
2. 啟動 httpd 服務
    #systemctl restart httpd.service
    再次連至 http://localhost/phpMyAydmin
    即可以 root無密碼登入
3. 登入後,為了安全性起見,先幫root改密碼

RPM CentOS 7 php-mbstring 5.4.16 x86_64 rpm
參考:http://rpm.pbone.net/index.php3/stat/4/idpl/26646085/dir/centos_7/com/php-mbstring-5.4.16-21.el7.x86_64.rpm.html

RHEL7安裝輸入法

圖形介面
應用程式/系統工具/設定值,點擊個人/地區和語言。
點擊「+」,可選擇熟悉的輸入法語言
漢語(Chewing)
漢語(Intelligent bopomofo)

終端機
1. 查閱輸入法
#yum search ibus 
2.安裝輸入法
#yum install ibus-table*
#yum install ibus-chewing ibus-table-chinese

2015年8月4日 星期二

RHEL7安裝EPEL、安裝遠端桌面系統XRPD

啟動內建的套件
「應用程式/系統工具/軟體」啟動下列幾項,安裝後會出現在「應用程式/雜項」
system-config-firewall 防火牆
system-config-user       使用者與群組


EPEL(Extra Packages for Enterprise Linux)是一個由Fedora Special Interest Group所維護的套件庫,且可用於 Red Hat 系列的Linux (如RHEL、CentOS與Scientific Linux)。以下為透過 EPEL 安裝一些官方沒有收軟體。

下載ERPL的套件庫
1. Fedora網站  https://fedoraproject.org/wiki/EPEL
2. 點選適當的版本下載並安裝套件  epel-release-latest-7.noarch.rpm
     If you are running an EL7 version, please visit here to get the newest 'epel-release' package for EL7: The newest version of 'epel-release' for EL7
3. 完成後會在 /etc/yum.repos.d 目錄下多兩個檔案。
     epel.repo
     epel-testing.repo


查詢是否有遠端遙控軟體
1. 查詢是否有xfreerdp軟體
     yum search xfreerdp  發現沒有
2. 安裝xfreerdp軟體
     yum install xfreerdp  若有可以安裝
3.  查詢IP位址
      ip address show
4.  查詢路由器狀態
      ip route show
5.  遠端連線
      xfreerpd -g 800x600 -u [UserName] [IP]


模擬的遠端桌面系統 xrpd
1. 透過別人建立好的軟體倉儲來安裝軟體
    上網查詢,關鍵字「install xrdp on CentOS7」
   #rpm -Uvh http://li.nux.ro/download/nux/dextop/el7/x86_64/nux-dextop-release-0-1.el7.nux.noarch.rpm
2. 安裝 xrdp
    # yum -y install xrdp tigervnc-server
3. 開機時自動啟動 xrdp服務
    #systemctl enable xrdp.service
4. 啟動 xrdp服務
    # systemctl start xrdp.service
5. 啟動防火牆設定
    # firewall-cmd --permanent --zone=public --add-port=3389/tcp
    #fire-cmd --reload
    若無法執行可改手動,應用程式/系統工具/軟體/防火牆,組態:永久(permanent)
      public/連接埠/加入/3389 tcp
   
如此一來,可用windows的遠端桌面連線,連線到虛擬機器,前提時VM的網路是「橋接器」。


參考:
http://www.itzgeek.com/how-tos/linux/centos-how-tos/install-xrdp-on-centos-7-rhel-7.html
http://idroot.net/tutorials/how-to-install-xrdp-on-centos-7/

2015年7月30日 星期四

RHEL7用vsftpd建立軟體倉儲(repo)、開firewall


開啟 USB 的連接
1. 至VirtualBox官網(https://www.virtualbox.org/wiki/Downloads)
    下載VirtualBox 5.0 Oracle VM VirtualBox Extension Pack All supported platforms 
2. 在VirtualBox,機器/喜好設定/擴充套件,點選右側倒三角形符號,選擇下載好的 Extension Pack,確定。
3. 在VirtualBox,設定值 /USB,點選 USB3.0,點選右側加號,加入現有USB隨身碟,確定。
4. 重新啟動,即可在桌面上看到你的隨身碟啦!


安裝 ftp server的套件- vsftpd (Very Secure FTP daemon)
1.下載iso黨並掛至光碟機
    裝置/光碟機/選擇iso檔案/rhel-server-7.0-x86_64-dvd.iso
2.安裝 vsftpd
   開啟該資料夾並搜尋「vs」,點 vsftpd 3.0.2「強制執行」。
3.安裝 createrepo 套件,目的在建立軟體倉儲
   將 rhel-server-7.0-x86_64-dvd.iso 中的所有檔案拷貝至「電腦(根目錄)/var/ftp/pub」,並在「電腦(根目錄)/var/ftp/pub/Packages」中搜尋「createrepo」,點選 createrepo-0.9.9 並「強制執行」。
4.建立軟體倉儲
  #createrepo -g /var/pub/repodata/76a~.xml /var/ftp/pub/  
  可用 Tab 鍵協助輸入,輸入成功會顯示以下訊息。
  Spawning worker 0 with 1091 pkgs
  Spawning worker 1 with 1091 pkgs
  Spawning worker 2 with 1091 pkgs
  Spawning worker 3 with 1091 pkgs
  Workers Finished
  Saving Primary metadata
  Saving file lists metadata
  Saving other metadata
  Generating sqlite DBs
  Sqlite DBs complete


建立軟體倉儲(repo)
cd /etc/yum.repos.d 改變路徑
ls 列出目錄下的檔案,發現無任何檔案
1. 開啟並編輯repo檔案內容
    #gedit test.repo 檔名test 副檔名 .repo
    輸入以下內容,儲存並關閉檔案。(藍字為名稱可自行定義)
    [RHEL7]      
    name=RHEL7
    baserul=ftp://localhost/pub
    enable=1
    gpgcheck=0
2. 啟動vsftpd
    #systemctl enable vsftpd.service 設定讓電腦開機就啟動ftp服務
    #restorecon -R /var/ftp/pub  將/var/ftp/pub底下的檔案通通恢復成預設的SELinux type
    #systemctl restart vsftpd.service  重新啟動ftp服務
    #systemctl state vsftpd.service   查閱ftp服務狀態
3. 啟動防火牆
    #firewall-cmd --permanent --add-service=ftp  


網路設定-手動設定固定IP


在圖形介面中右上方有一台電腦連線圖示的按鈕,點選/網路設定值。
依據實體機器連上網路來設定,網路橋接器的設定方式為,在機器/設定值/網路/啟動網路卡/附加道橋接介面卡。

浮動IP改為固定IP
方法一、
1. 網路/右鍵/Wired/IPv4,紀錄網路參數(IP位址、遮罩、通訊閘...)
2. 點選設定(齒輪圖示),IPv4/自動DHCP改為手動,將剛才紀錄的網路參數填入,如下
    IP位址:10.0.2.15
    遮罩(Netmask):255.255.255.254
    通訊閘:175.182.92.82
    關閉DNS
    伺服器:8.8.8.8
3. Wired 關閉再開啟
方法二、
打開終端機,「nmtui-edit」會開啟新畫面,設定用 Tab鍵,設定如方法一的內容。
[x]表示要做


測試是否能連上網路?
打開終端機 ping 168.95.1.1表示連到中華電信,若連線成功會出現類似以下的資訊!
PING 168.95.1.1 (168.95.1.1) 56(84) bytes
64 bytes from 168.95.1.1: icmp_seq=1 ttl=63 time=23.6ms
64 bytes from 168.95.1.1: icmp_seq=2 ttl=63 time=19.7ms
64 bytes from 168.95.1.1: icmp_seq=3 ttl=63 time=21.8ms
                                               ...
                                               ...
要停止按 ctrl + C

RHEL7 Linux 忘記開機密碼

忘記Linux密碼該怎麼辦?RHCSA必考的考題,解決忘記密碼的方法有三種。
  • 若連BOIS(開機輸出輸入系統程式)都被鎖住,可將電池「放電」,只要電池無電的情況下開機,所有設定就會回復原設定。
  • 開機選單:用DVD或USB開機去更改grub.conf檔案
  • root:開機選單更改root密碼,只需 9個步驟就能完成囉。如下
  1. 重新開機,立即按鍵盤上的上下鍵,選擇「Red Hat Enterprise Linux Server, with Linux xxxx....」,接著 Press 'e'
  2. 在畫面中,按下移鍵找到「linux16/...」 這一串字最後面加上「rd.break」(CentOS 7版本,CentOS6以前的版本則 1 ) 或「 init = /bin/bash 」,接著 ctrl+x 重新啟動
  3. 出現「switch_root:/#」 #表示root權限,輸入「mount -o remount,rw /sysroot 」讓 /sysroot 目錄重新掛載為可讀,rw表示讓mount的磁區可讀寫。
  4. 「chroot /sysroot 」更換根目錄
  5. 「passwd root 」更改root密碼,注意,這裡會要求輸入兩次密碼、且要8個字。
  6. 「touch /.autorelabel 」
  7. 「exit 」離開畫面、「exit 」離開
  8. 登入/點「沒有列出來?」/使用root帳號登入